Payments2Us can match records both automatically and manually by searching for existing contacts already in the database.
After a receipt has been send, the Payment Txn record is eligible for matching. If automatic matching is enabled this process will start when:
- If the Batch Processor is started, then the Batch Processor will change the status to Matching Start to trigger the update
- If the Batch Processor is NOT running, then the process will start when the Receipting is complete.
1. Enabling Automatic Matching

The Merchant Facility tab can be found within the Payments2Us menu (Top right picklist in Salesforce - Select Payments2Us), or it can be found under the "More" at the end of the tabs. (In Salesforce Classic - It can be under the "+" at the end of the tabs)
Once you have clicked on the Merchant Facility Tab, select the appropriate List view (Example - "All Merchant Facilities") and click into Merchant Facility you wish to update.
1.2. Scroll down to the 'Account, Contact, Opportunity Matching' heading

1.3. Select 'Match and Create New if No Match Found' and SAVE
2. How does matching work using Matching Rules?
2.1. Matching Rules Weightings
Matching works on the number of fields that match on the Payment Txn record to fields on the contact record. Each filed that matches is allocated a weighted score. When the score is greater than 50, it is considered a good match. The combination of fields that has a highest matches is then used.
For some fields, such as "Account" name, the matching of the name is case insensitive, spaces are removed when comparing and words such as "limited" "pty" etc. are remove from being compared.
The weighting for different field values are:
- Email + 80
- Mobile + 80
- Phone + 20
- Membership Id + 90
- Street + 30
- Account + 25
- Last Name + 25
- Suburb + 15
- First Name + 20
- Fundraiser Id + 70
- [Custom_Field__c] + 20
Each of the rules are evaluated separately. If any have blank component, then they are excluded. For example, if you had a matching rule of "First Name" + "Last Name" + "Suburb" and the following values
- First Name: John
- Last Name: Smith
- Suburb:
This rule would be excluded from evaluation as suburb has blank.
Matching rules are maintained on the Merchant Facility
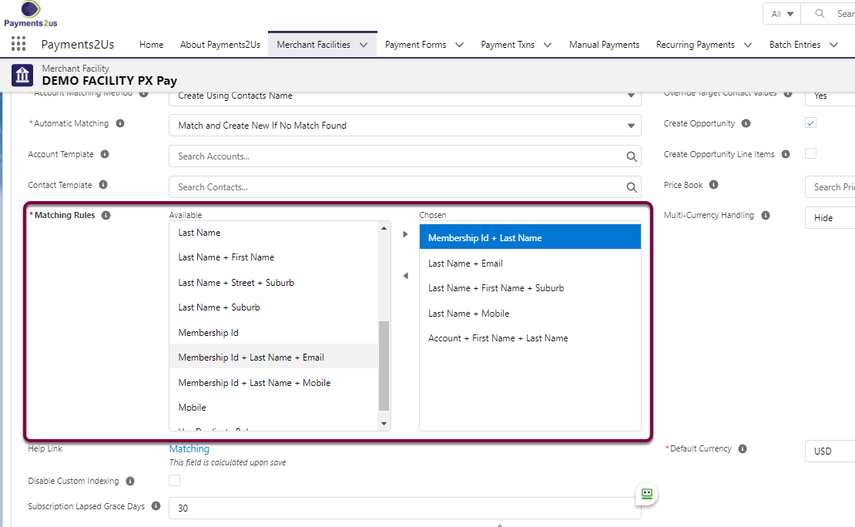
2.2. Adding custom fields to Matching Rules
The below procedure is provided for Advanced Admins. Should you require help or more information, you will need to purchase our Premium Support package.
You can add custom fields to consider for matching.
Contact Level Matching
You can use fields on the Payment Txn Object to match to the Contact Object.
If using a custom field on the Contact object, make sure it has a corresponding field with the same type and API name on the Payment Txn object.
The Matching will work with Payments2Us fields mapping to standard fields. E.g. A Payment Txn Field "AAkPay__MailingState__c" will map/use the standard contact field "MailingState"
Adds a new picklist value to the Merchant Facility Object, field "Matching Rules". Make sure this is added to ALL record types.
The value would be something like "First Name + Last Name + [Chapter__c]", where:
- The values "First Name + Last Name + " are based of existing pick list values / standard rules. Note these have to be exact including the case of the words and spaces.
- The value [Chapter__c] is the custom fields api name surrounded by "[]". This field needs to exist on the Payment Txn Object AND the Contact Object.
Another example picklist value could be "First Name + Last Name + [AAkPay__MailingState__c]". Note, the API Name field entered should always be the API field name on the Payment Txn object. In this examples, it will match to Contact fields "MailingState" (a standard Contact field) or "MailingState__c" (if there was a custom field on the Contact added).
Account Level Matching
You can use fields on the Payment Txn Object to match to the Account Object.
If using a custom field on the Account object, make sure it has a corresponding field with the same type and API name on the Payment Txn object.
The Matching will work with Payments2Us fields mapping to standard fields. E.g. A Payment Txn Field "AAkPay__Phone__c" will map/use the standard Account field "Phone"
Adds a new picklist value to the Merchant Facility Object, field "Matching Rules". Make sure this is added to ALL record types.
The value would be something like "Account + [ABN__c]", where:
- The values "Account + " are based of existing pick list values / standard rules. Note these have to be exact including the case of the words and spaces.
- The value [ABN__c] is the custom fields api name surrounded by "[]". This field needs to exist on the Payment Txn Object AND the Account Object.
Another example picklist value could be "Account + [ABN__c]". Note, the API Name field entered should always be the API field name on the Payment Txn object. In this examples, it will match to Account field "ABN" AND Name.
For "Account Name", this is case insensitive and for matching purposes, details like "Pty", "Ltd", "Corporation" etc. are removed. The formula field "Account Name Search" on the Account Object is used.
The "Account + " should be included with all matching rules with custom fields at the Account level.
3. How does matching work using Duplicate Rules?
3.1. Enabling use of Payments2Us with Duplicate Rules
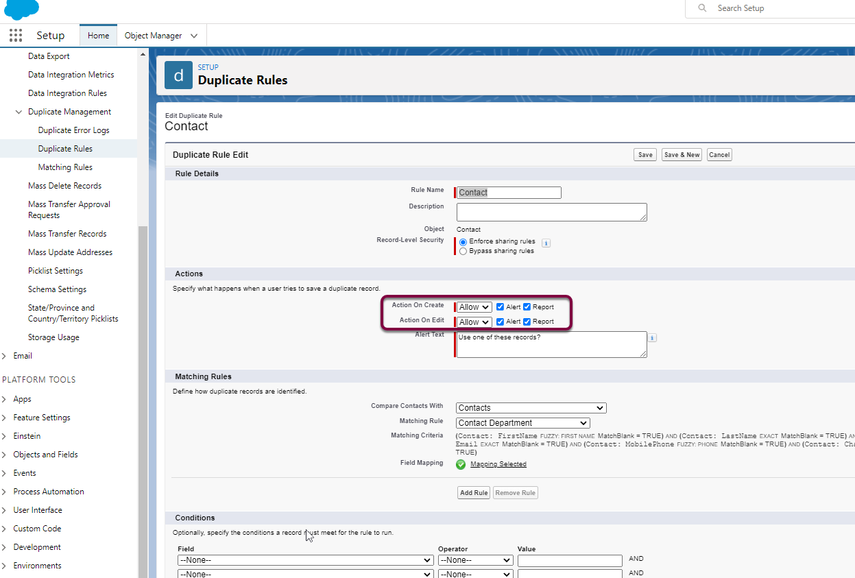
You can use Standard Salesforce Duplicate Rules. For these, you need to make sure the Allow on Create and Allow on Edit is set to "Allow"
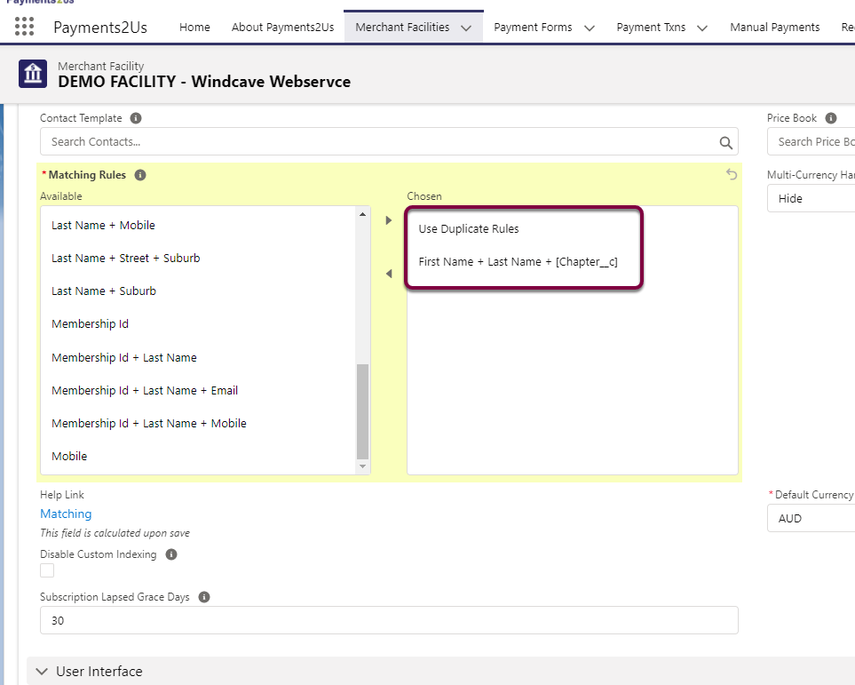
To use Salesforce duplicate rules, you need to select "Use Duplicate Rules" and at least one Criteria in the Matching Rules on the Merchant Facility
NOTE you must select one other criteria. In the screenshot, this is showing "First Name + Last Name + [Chapter__c]" Where chapter__c is a custom field.
Another good option would be "First Name + Last Name + Email"
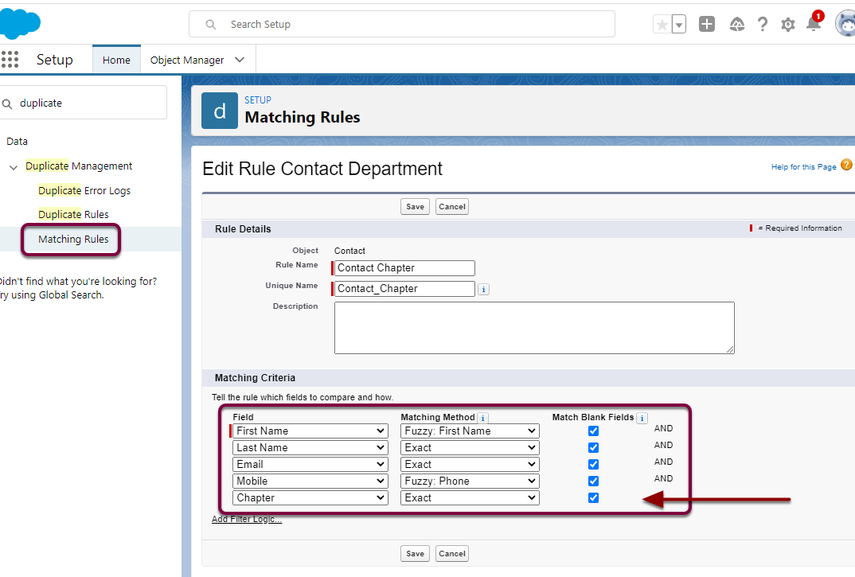
3.2. Using Duplicate Rules with Custom Fields
The below procedure is provided for Advanced Admins. Should you require help or more information, you will need to purchase our Premium Support package.
You can use custom fields in conjunction with Duplicate Rules.
To illustrate an example of how custom fields can be used in conjunction with Duplicate Rules, we will use an example scenario below.
Organisation XYZ has the requirement that the same Contact can exist on file, but must be unique for their own "Chapter" (aka Division or Department)".
So the following are allowed unique Contacts.
- John Smith, john.smith@mycompany.com, Chapter: North
- John Smith, john.smith@mycompany.com, Chapter: South
- John Smith, john.smith@mycompany.com, Chapter: East
To enable this, a picklist field called "Chapter" is added to BOTH the Contact and Payment Object. It would have the values of say "North", "South", "East", "West"
The System Administrator then adds a new picklist value to the Merchant Facility, field "Matching Rules". Make sure this is added to ALL record types.
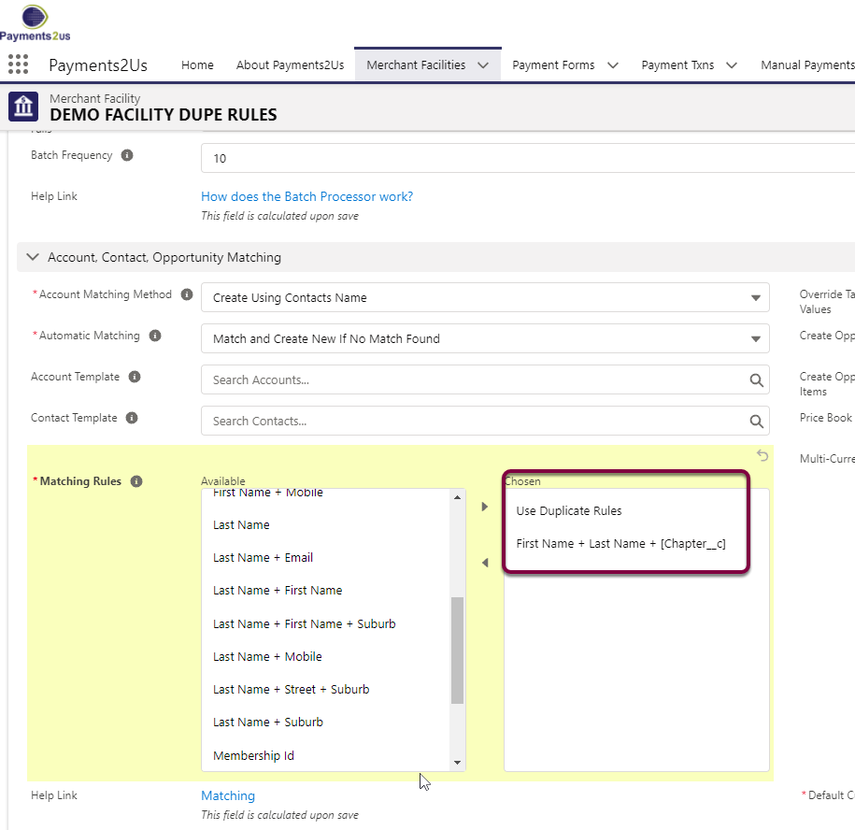
The value would be something like "First Name + Last Name + [Chapter__c]", where:
- The values "First Name + Last Name + " are based of existing pick list values / standard rules. Note these have to be exact including the case of the words and spaces.
- The value [Chapter__c] is the custom fields api name surrounded by "[]"
The administrator selects the new rule on the Merchant Facility
Setup a Matching Rule to match the criteria required.
An Example is shown below
After setting up the Matching Rule, mark the Matching Rule as Active.
Setup your a duplicate rule and mark as Active.
An example is provided below

4. Match Only - option

If the Automatic Matching is set to "Match Only", then depending on the score calculated is High/Low or None then the resulting action as shown in the table above will apply.
Low matches need to be reconciled manually