This set up is required for Paypal Recurring Payments. Existing webhooks will work even if Recurring Paypal is enabled after this setup, you do not need to repeat this process.
1. Setting up PayPal Accounts with Payments2Us
1.1. Login into PayPal Developer
1.1.1. Go to https://developer.paypal.com
Click on the "Log into Dashboard" button on the top right

1.1.2. Login into PayPal dashboard
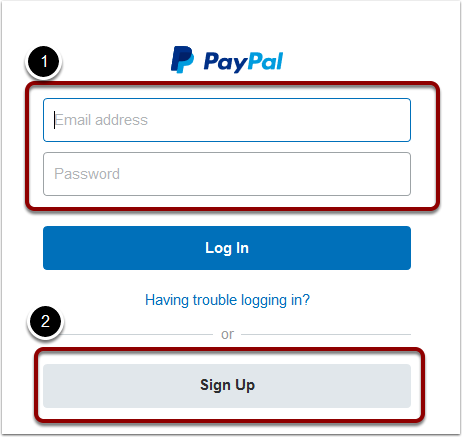
- If you already have a PayPal Account, then use your production username/password.
You'll have the option of selecting a sandbox/test unstance later. - If you do not currently have a PayPal Account, then select the Sign Up option.
Please make sure you select a "For Your Business" account type.
After setting up a new account, you will need to return to https://developer.paypal.com
1.2. Set up a test (sandbox) version of PayPal
A sandbox instance is useful if you wish to test the PayPal integration.
We recommending testing PayPal and your processes prior to setting up a live account.
1.2.1. Enter Sandbox Mode
Enable Sandbox Mode by selecting the Sandbox On switch (1)


1.2.3. Create Sandboxes

- If you have some accounts already, then you can use these accounts for testing
- Or, if you'd prefer, you can create your own Sandbox accounts.
We would recommend having one account as a BUSINESS Type and one account as a PERSONAL type.
The BUSINESS Type is used to emulate your business (i.e. an organisation that is selling and collecting funds).
The PERSONAL Type is used to emulate a buyer or person that is purchasing goods from the BUSINESS account.
1.3. Create a PayPal App
click back to your Dashboard, click on in the "Apps and Credentials". Scroll down to the "REST API apps" section and click "Create App"

1.3.1. Name your app, and select your Seller account and then click Create App.
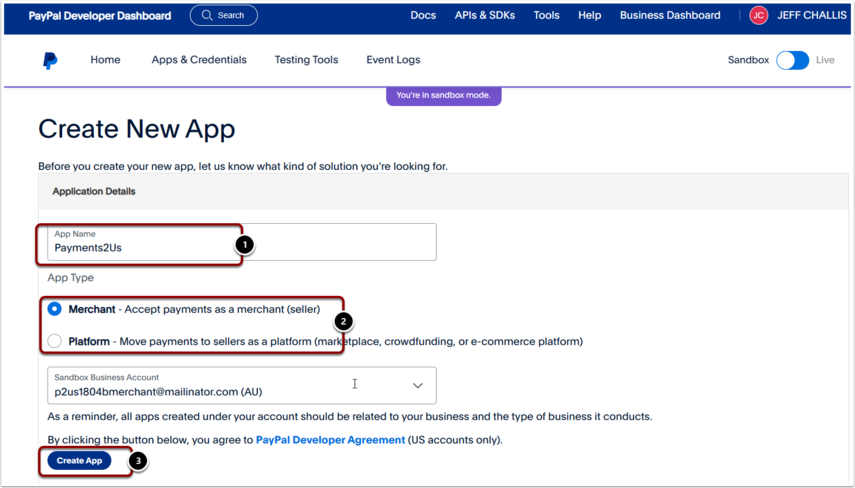
- Enter in an App Name
- Select "Merchant"
- Press Create App
A second screen will display. Accept the defaults and Save.
1.4. Locate your PayPal Credentials
1.4.1. Check you are in Sandbox or Production mode
Before starting this section, check if you are in setting up a test (Sandbox) or looking to setup a Production credentials for PayPal

1.4.2. Locate your PayPal App
- Navigate to Dashboard, select Apps & Credentials.
- Scroll down the screen to the "REST API apps" and click into the App. Note, the App was setup in the previous step of this manual

1.4.3. Copy your PayPal Credentials
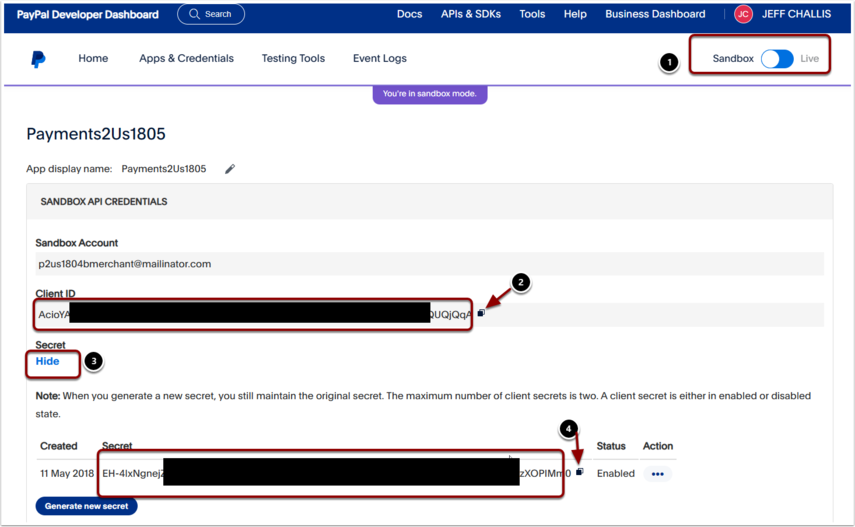
Note, this is the same area you go to get your Sandbox or Production details. Select radio button (1) to toggle between the two
Warning, keep these details secure. Do not email these details to anyone.
- check again that you are looking for the Sandbox or Live details.
- Client Id will become the username. Copy this to something like notepad. You'll need this shortly
- The Show/Hide Link will reveal or hide the Client Secret. If you cannot see the Secret area, then press "Show" link
- Client Secret will become the password. Copy this to something like notepad. You'll need this shortly
1.5. Enter details into Salesforce
1.5.1. Enter PayPal Credentials into Salesforce
In Salesforce, locate your Merchant Facility that you wish use.
Edit merchant facility and update the credentials in the PayPal Section

Copy the Client ID code and Secret code. These were located in the previous section of this manual "Locate your PayPal Credentials"
Ensure you select the correct PayPal Environment
1.5.2. Enable PayPal method of Payment

On the Merchant Facility, you can now add "PayPal" as a method of Payment.
If you don't wish to make PayPal available for all Payments Forms, then you can create a URL Token with PayPal Selected there. Then exclude PayPal as an option on the Merchant Facility.
You can configure Payments2Us to work with a PayPal Sandbox (Test) account or Production account. Payments2Us supports PayPal offerings that support the PayPal Express Checkout option.
2. Setting up PayPal for Recurring Payments
To use recurring payments, you'll need to have a PayPal Recurring License. Please contact info@payments2us.com for a key.
PayPal webhooks are used to communicate PayPal notifications such as a user canceling their service, a successful payment or failed payments.
The webhooks will either create a Payment Txn record in Salesforce for payment related activities, or will update the Recurring Payment object status for Billing Agreement related updates.
2.1. Locate the PayPal Webhook
You only need to associate the PayPal webhook with ONE Payment Form. This must be a Payment Form linked to your live/production Merchant Facility and ideally the Payment Form used with your Recurring Payments. If the primary Payment Form is being used elsewhere for a webhook (eg. Stripe or Shopify webhook), then any other Payment Form linked to the live/production merchant facility will work.
In Salesforce, navigate to the Merchant Facility. Click into the Merchant Facility you wish to use, then locate the Payment Form you wish to use form the related lists.
Click into the Payment Form
Scroll down to the Orders/Supplies/Payments section
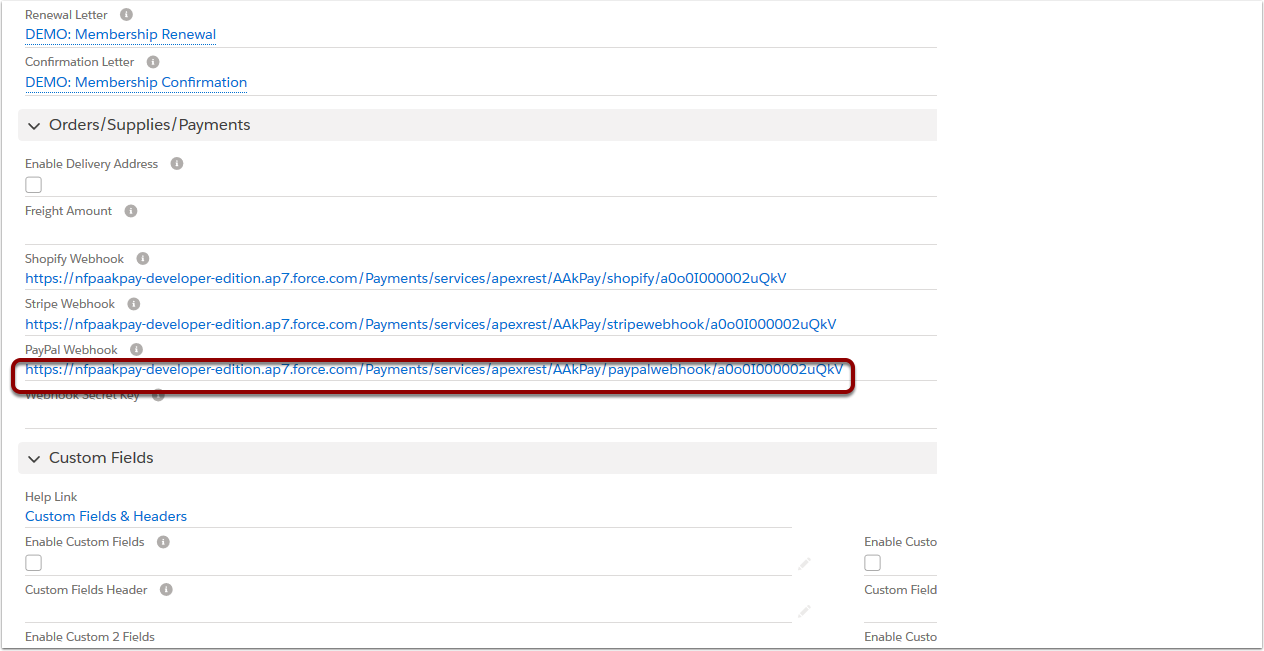
Copy the PayPal Webhook URL. You'll need this for the next step.
2.2. Add Webhooks to PayPal
2.2.1. Log into PayPal Developer
Goto website: https://developer.paypal.com
Login (top right) using your production PayPal Username/passwords
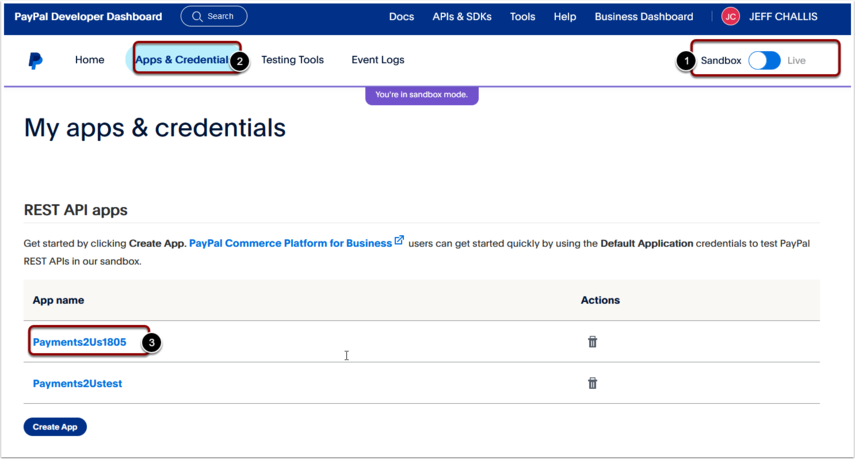
- Make sure you are updating the correct instance (Sandbox is for testing, Live is for production).
- Click on "Apps & Credentials" under the Dashboard heading
- Scroll down to the REST API apps section
Click on to the App (Created in the Setting up PayPal Accounts with Payments2Us section of this manual)
2.2.3. Add Webhook
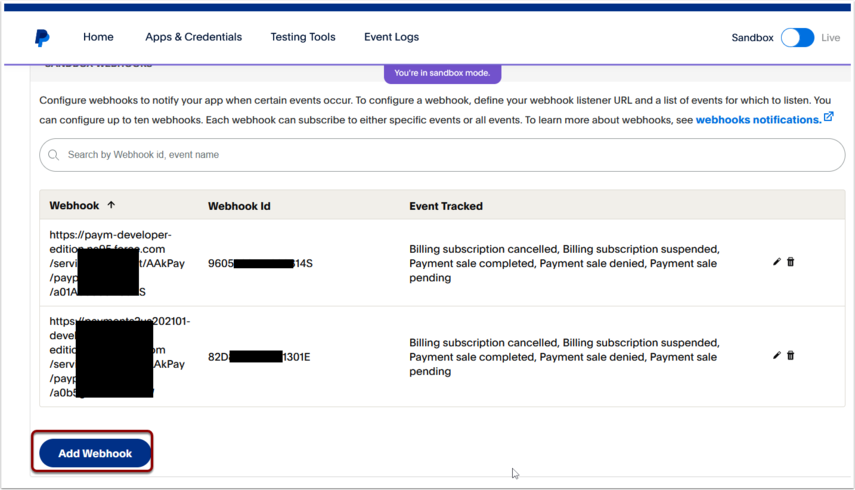
Scroll down to the Webhook Section and press the "Add Webhook" button
2.2.4. Enter Webhook Details
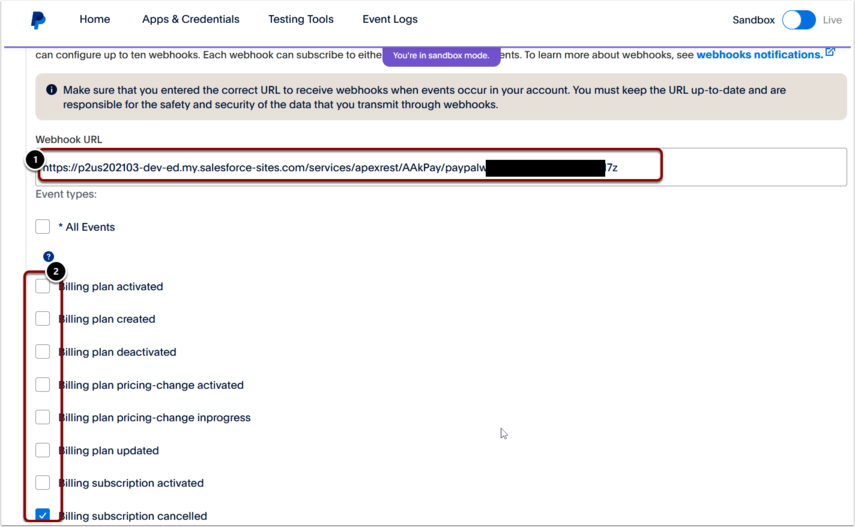
- Enter the webhook URL as copied from Salesforce Payment for as per this User Manual step Locate the PayPal Webhook
- Select the following Event Types
- Billing subscription cancelled
- Billing subscription suspended
- Payment sale completed
- Payment sale pending
- Payment sale denied
Press SAVE after entering these details
2.2.5. Copy webhook Id
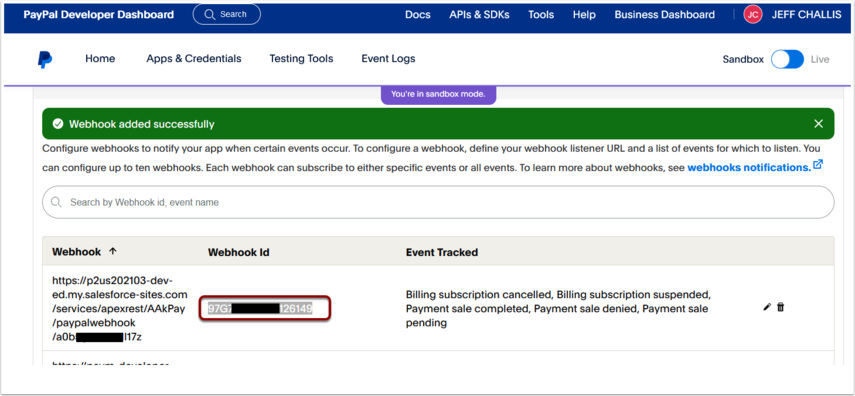
Select the Webhook Id and copy this. You'll need this for the next step
2.2.6. Update Payment Form Webhook Secret Key

Paste the copied webhook id into the Webhook Secret Key section on the Payment Form. This must be the same Payment Form for where the PayPal Webhook was copied in earlier steps in this procedure.