1. Receipts Overview
Receipts are setup by creating a new Letter (Tab in Payments2Us).
After creating a Receipt Letter, you can then assign it to one or more of the following:
- Campaign
- Payment Form
- Merchant Facility
When a new Payment is created, the receipt letter is automatically assigned when the status is one of the following:
- Payment Complete
- Authorisation Complete
- Manual Payment
- Awaiting Payment
When assigning the Receipt Letter, the following logic is used.
- If there is a Campaign linked to the Payment Txn and the Campaign has a Receipt Letter linked to it, then this Receipt Letter is used
- Otherwise, if there is a Receipt Letter Linked to the Payment Txns associated Payment Form, then that Receipt Letter is used
- Otherwise, the Receipt Letter on the Merchant Facility is used
2. Creating a new Receipt Letter
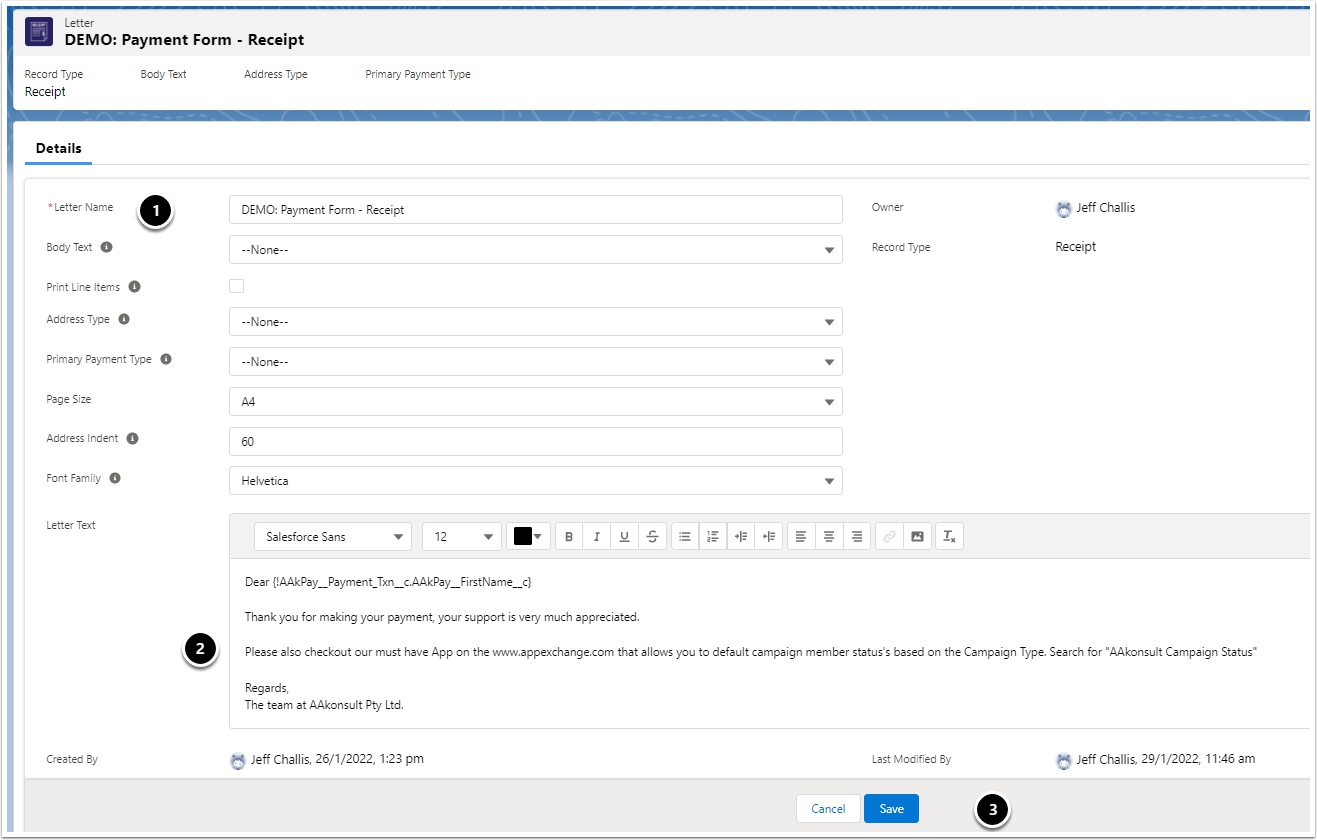
- Navigate to the "Letters" Tab
- Press the New button
- Select Record Type Receipt
- Enter the Receipt Details and Save

- Give the receipt a name - e.g. Christmas Appeal 20017
Layout type defaults to Full. The use of Short is normally used in conjuction with "Print Line Items" - Enter the body text. This can include images and some styling.
You can use mail merge fields as part of the text. See How to change Receipt body text and mail merge fields for Receipt/Letter Template
Note, the object that is being merged with are:- Receipts: Payment Txn
- Membership Renewals and Membership Confirmations: Subscriptions or Account Subscription
- Annual Statements: Contact
- Save the template, then locate the appropriate Campaign, Payment Form and/or Merchant Facility the Receipt Letter should be associated with and update those objects with this Receipt Letter.
3. How to update various parts of a Receipt/configuration options

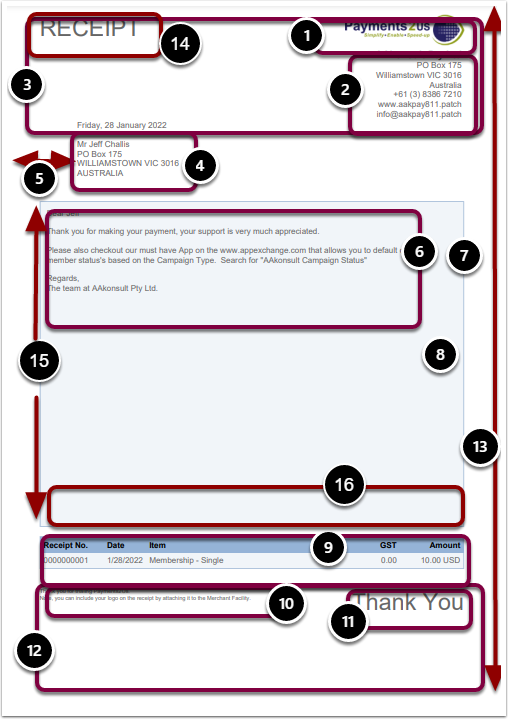
- Logo - see How to put your company logo on the Receipt Template
- Company Information - see How to put your company information into the Receipt Template
- Company Letterhead graphic - see How to put your company letterhead on the Receipt Template
- Address Information - Letter Object, field "Address Type" controls which address field to use. Also see: How to adjust the Address details in the Receipt/Letter Template
- Address Indent - Letter Object, field "Address Indent" controls how far the indent in is. Default is 60px.
- Body Text - Letter Object, button Letter Builder to setup and insert mail merged fields.
- Colours - These are maintained on the Merchant Facility Object. See: How to change the colours of the Receipt Template
- Fonts - Letter Object, field "Font Family".
NOTE: This is a list of ALL supported fonts and no others can be added.
NOTE: Only "Arial Unicode MS" will work with double byte characters. If double byte characters are used with any other font, they will come out as blank. - Totals Table. Letter Object, button Letter Builder to maintain. See How to adjust the payment totals section in the Receipt/Letter Template
- Footnote. This value is entered on the Merchant Facility, field: "Receipt Footer"
- Thank You text. This can be replaced by loading a graphic with the name containing "thankyou" against the Letter, Payment Form or Merchant Facility Object
- Footer graphic. See procedure How to put your company Footer on the Receipt Template
- Page Size (A4/Letterhead). Letter Object, field "Address Indent "Page Size" allows for the selection of page size. Default is A4.
- This section can be changed to any required Title Is there a way to change the word RECEIPT to a different text or word?
- The body height is set by the "Body Text" picklist field on the Letter Object. This can be Full (default), Short (good for annual statements or when used with Print Line Items), Hide (do not display at all)
- You can select to include line items table. This is useful for Annual Statements where each Payment Txn is shown. For general receipts this might be useful for Split Payments where the "Payment Items" records related to the "Payment Txn" are shown.
To enable line items, check the "Print Line Items" checkbox on the Letter Object.