This setup procedure overrides the standard new and/or edit page layouts for Leads, Accounts or Contacts. This option allows for similar functionality to standard salesforce, but includes auto-complete and address validation.
The alternative option for the buttons and links for address validation provides one option for using the address validation. This option places a button and/or a link that when press pops up a screen for entering the address information.
Address buttons and links auto-complete and new/edit page override is available for the following objects in Salesforce CRM:
- Leads
- Contacts
- Accounts
You must first have setup data validation with the Data Validation Provider:
Quick Steps for installation:
- On the objects you wish to add validation, do the following:
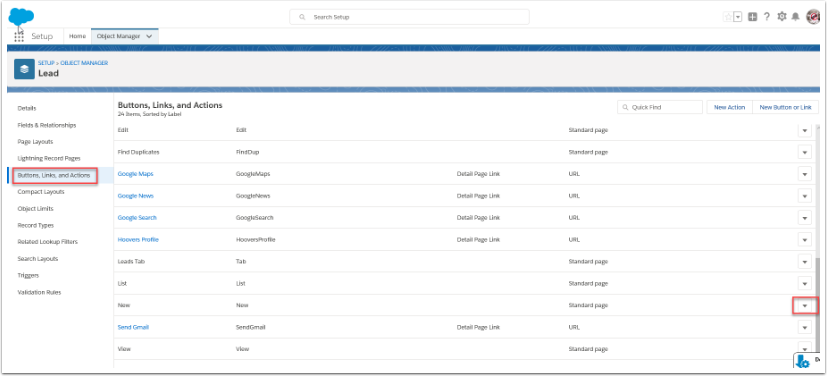
- Navigate to setup > customize > {object} > Buttons, Links and Actions
- Press edit next to "New" link - select visualforce page AAkPay__{object}Edit and Save
- Press edit next to "Edit" link - select visualforce page AAkPay__{object}Edit and Save
If you wish to change the section headings, please see: How to change field names, section heading names and information messages
1. Overriding NEW Page for Leads to include address auto-complete and validation
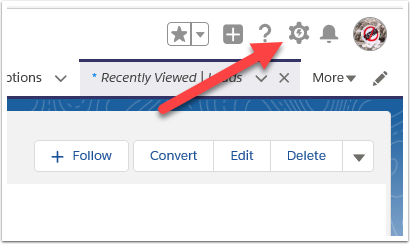
1.2. Type Objects Manager into the Quick Find bar, or go to Data>Objects and Fields

1.3. Select Lead

1.5. Under Salesforce Classic Override, select leadEditL[AAKPay__leadEditL]. Click Save
/div>

2. Overriding EDIT Page for Leads to include address auto-complete and validation
2.1. Follow Steps 1.1-1.4 and select the drop down arrow next to Edit, and select Edit

2.2. Under Salesforce Classic Override, select leadEditL[AAKPay__leadEditL]. Click Save

3. Changing the Lead Page Layout
As the new and/or edit page layouts have been replaced with the Payments2Us Visualforce page, the standard salesforce edit layout option is no longer available.
However, you can still change the layouts and fields that are shown/available by change the fields that appear in the field set.
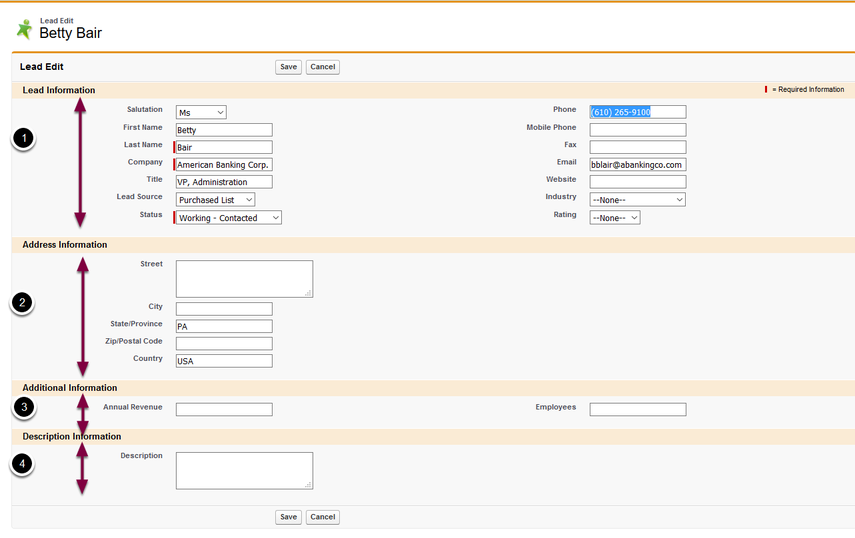
The form is made of of several fieldsets. These are:
- leadSectionInformation
- leadSectionAddress
- leadSectionAdditionalInfo
- leadSectionDescription
A special fieldset called leadSectionOrder is used to control the order that each of the sections appear.
3.1. Edit Lead Field Sets

- Navigate to setup > Customize > Leads > Field Sets
- Click edit next to the section you wish to amend
3.2. Changing fields in the Field Set

You can add/remove fields from the section, change the display order and make required/optional
- Add fields by dragging them from the available fields pallet to the fields that are in the Field Sets section
- Change the order of fields by dragging them up/down in the fields in Field Set section
- Double click a field to make it required/optional
4. How to reorder the sections on the Lead page layout
4.1. Edit leadSectionOrder Field Sets

- Navigate to setup > Customize > Leads > Field Sets
- Click edit next to the section you wish to amend
4.2. Change Sections order and Save

5. Overriding NEW Page for Accounts to include address auto-complete and validation

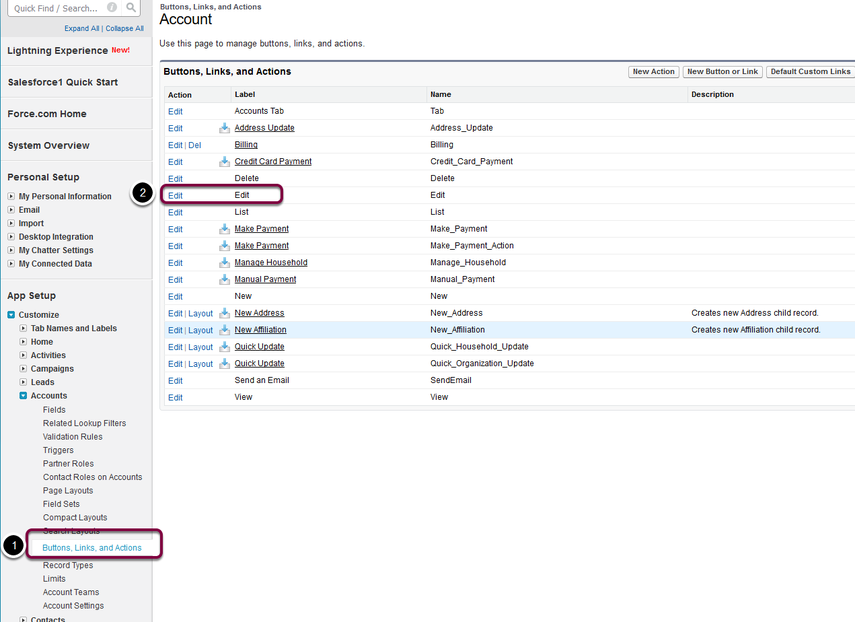
- Navigate to setup > Customize > Account > Buttons, Links and Actions
- Click edit link next to new button
5.2. Assign Visualforce Page AAkPay__AccountEdit

- Select AAkPay__accountEdit
- Press Save button
6. Overriding EDIT Page for Accounts to include address auto-complete and validation
- Navigate to setup > Customize > Account > Buttons, Links and Actions
- Click edit link next to new button
6.2. Assign Visualforce Page AAkPay__AccountEdit

- Select AAkPay__accountEdit
- Press Save button
7. Changing the Account Page Layout
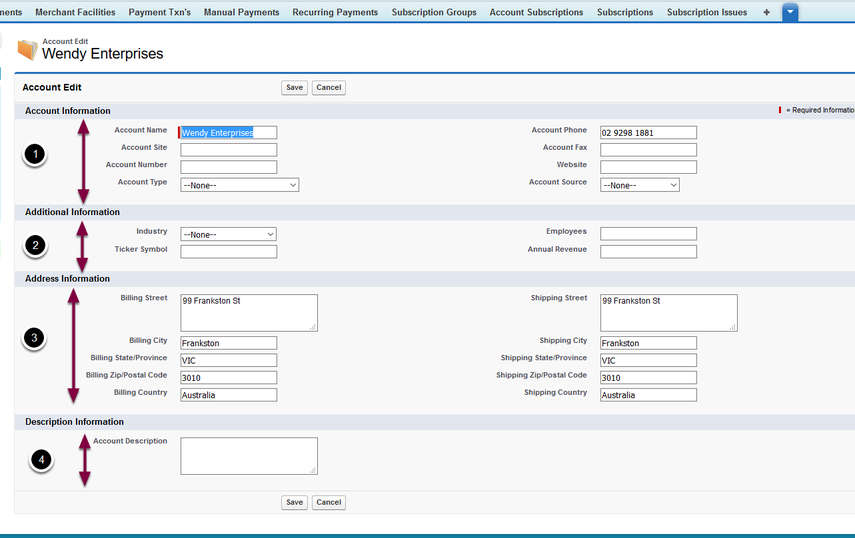
As the new and/or edit page layouts have been replaced with the Payments2Us Visualforce page, the standard salesforce edit layout option is no longer available.
However, you can still change the layouts and fields that are shown/available by change the fields that appear in the field set.
The form is made of of several fieldsets. These are:
- accountSectionInformation
- accountSectionAddress
- accountSectionAdditionalInfo
- accountSectionDescription
A special fieldset called accountSectionOrder is used to control the order that each of the sections appear.
7.1. Edit Account Field Sets

- Navigate to setup > Customize > Accounts > Field Sets
- Click edit next to the section you wish to amend
7.2. Changing fields in the Field Set
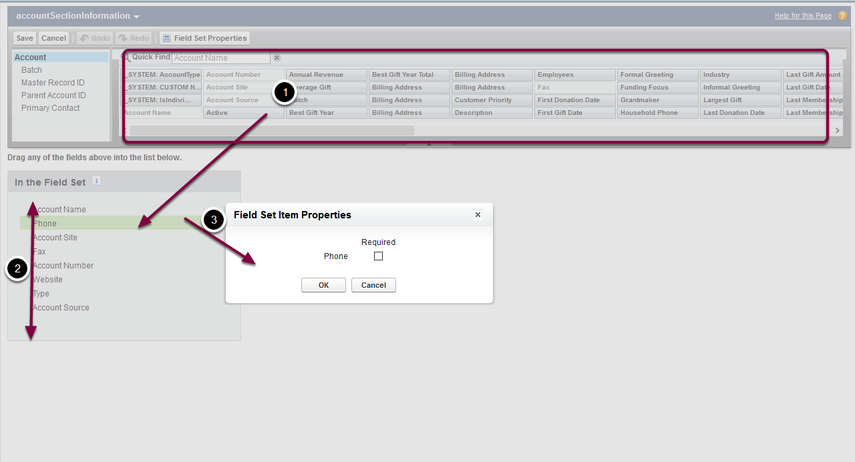
You can add/remove fields from the section, change the display order and make required/optional
- Add fields by dragging them from the available fields pallet to the fields that are in the Field Sets section
- Change the order of fields by dragging them up/down in the fields in Field Set section
- Double click a field to make it required/optional
8. How to reorder the sections on the Account page layout
8.1. Edit accountSectionOrder Field Set
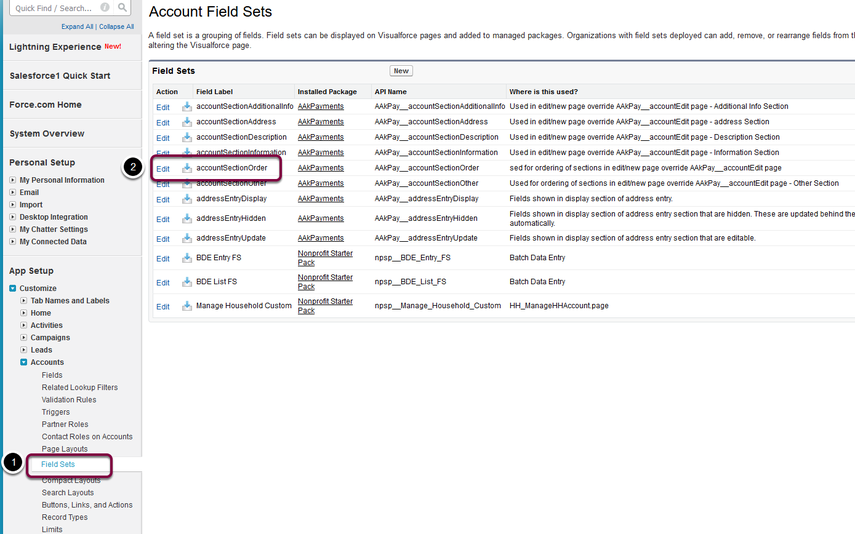
- Navigate to setup > Customize > Accounts > Field Sets
- Click edit next to the section you wish to amend
8.2. Change Sections order and Save

9. Overriding NEW Page for Contacts to include address auto-complete and validation

- Navigate to setup > Customize > Contact > Buttons, Links and Actions
- Click edit link next to new button
9.2. Assign Visualforce Page AAkPay__contactEdit

- Select AAkPay__contactEdit
- Press Save button
10. Overriding EDIT Page for Contacts to include address auto-complete and validation

- Navigate to setup > Customize > Contact > Buttons, Links and Actions
- Click edit link next to new button
10.2. Assign Visualforce Page AAkPay__contactEdit

- Select AAkPay__contactEdit
- Press Save button
11. Changing the Contact Page Layout

As the new and/or edit page layouts have been replaced with the Payments2Us Visualforce page, the standard salesforce edit layout option is no longer available.
However, you can still change the layouts and fields that are shown/available by change the fields that appear in the field set.
The form is made of of several fieldsets. These are:
- contactSectionInformation
- contactSectionAddress
- contactSectionDescription
- contactSectionAdditionalInfo
A special fieldset called leadSectionOrder is used to control the order that each of the sections appear.
11.1. Edit Contact Field Sets

- Navigate to setup > Customize > Contacts > Field Sets
- Click edit next to the section you wish to amend
11.2. Changing fields in the Field Set
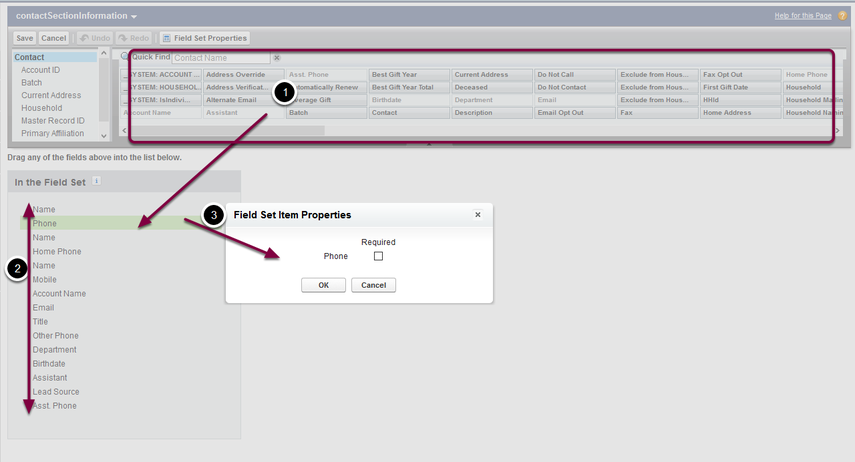
You can add/remove fields from the section, change the display order and make required/optional
- Add fields by dragging them from the available fields pallet to the fields that are in the Field Sets section
- Change the order of fields by dragging them up/down in the fields in Field Set section
- Double click a field to make it required/optional
12. How to reorder the sections on the Contact page layout
12.1. Edit contactSectionOrder Field Set

- Navigate to setup > Customize > Contacts > Field Sets
- Click edit next to the section you wish to amend
12.2. Change Sections order and Save
