Sorry, we didn't find any relevant articles for you.

Send us your queries using the form below and we will get back to you with a solution.

Installation

Topics on Installation

Install Error - The ActionId specified was invalid for ActionType

If you get an error message email to you as part of the AppExchange install proce ...

If you get an error message email to you as part of the AppExchange install process that includes the words "The ActionId specified was invalid for ActionType", such as:

"1. (Account_Subscription__c-Account Subscription Layout) The ActionId specified was invalid for ActionType QuickAction.

Account_Subscription__c-Account Subscription Layout: The ActionId specified was invalid for ActionType QuickAction. "

then you will need to enable Chatter for your org.

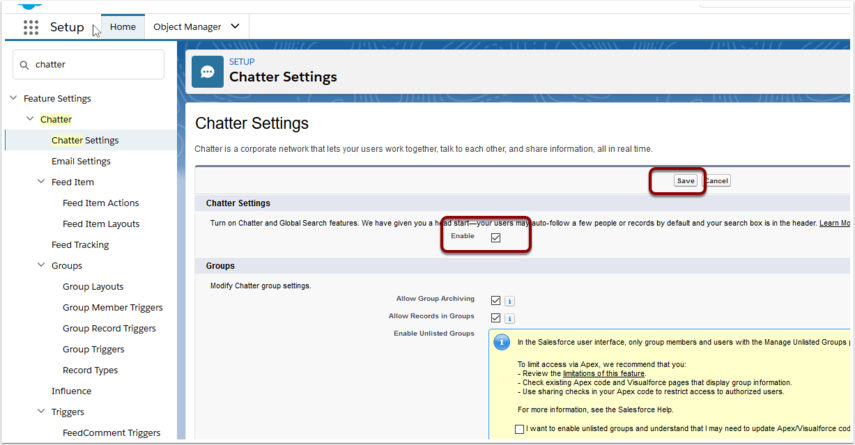
To enable Chatter, go to setup. Quick find "Chatter". Click into Chatter Settings

Does Payments2Us use Salesforce certificate or keys?

No, Payments2Us does not use Salesforce Certificate or Keys. ...

No, Payments2Us does not use Salesforce Certificate or Keys.

This app can't be installed - Missing Organization Feature: Chatter

You need to enable Chatter before installing. Navigate to setup - Search "Chatter ...

You need to enable Chatter before installing.

Navigate to setup - Search "Chatter Settings" (1). Click into the "Chatter Settings" menu option (2).

Edit and enable Chatter (3)

App Settings shows Broken/Unable to connect icon

1. About broken/unable to connect icon on Lightning Page 2. Copy broken icon link ...

1. About broken/unable to connect icon on Lightning Page

  1. Hover over the icon
  2. Then select and copy the URL shown

  1. Click on setup icon
  2. Search "Session Settings"
  3. Click on Menu item "Session Settings"
  4. Click "Add Domain" button

4. Paste Trusted Domain URL

Paste the the URL that you copied in proceeding step of this procedure. Make sure it begins with "https://".

Select "IFrame Type" of Visualforce Pages

Press "Save" button

Make sure the URL starts with "https://"


5. Locate Lighting Page URL

We recommend opening a new browser Tab at this point as you'll be coming back to the same page with another URL.

Navigate to the Payments2Us Settings Tab.

Copy the URL Upto the first "/"

  • Navigate to session Settings and press Add Domain (See step 4.3 of this procedure)
  • Paste the URL just copied above and save (See step 4.4 of this procedure)

If you see a screen with the broken component that is similar to the screenshot below, then please follow the steps in this procedure.

What to do when you get similar errors- "The formula references fields across 16 unique relationships while only 15 are allowed. Please contact support at salesforce.com for more assistance.

If you get a error when trying to upgrade or install that is "similar" to the fol ...

If you get a error when trying to upgrade or install that is "similar" to the following"The formula references fields across 16 unique relationships while only 15 are allowed. Please contact support at salesforce.com for more assistance.Subscriber_Group__c.Subscription_End_Date__c: The formula references fields across 16 unique relationships while only 15 are allowed. Please contact support at salesforce.com for more assistance".

Payments2Us does NOT exceed the maximum number of allowed cross reference formula fields as part of the standard package.

If you add your own formula fields, then the maximum can be exceeded. As per the error message, you will need to log a request asking Salesforce to increase the number of cross reference formula fields.

You should do this for production. You can ask Salesforce to apply to the sandbox, but may need to do a new refresh to pick up the limit.

Please see this Salesforce help article for more information.

We have assigned Permission Sets to a few users, but all users can see Payments2Us

The most likely reason this happens is when Payments2Us was first installed from ...

The most likely reason this happens is when Payments2Us was first installed from the AppExchange, the option to install for all users was selected. Options are:

  1. If you have just installed the App and have not completed any configuration, then uninstall Payments2Us (make sure sure you untick the remember 48hours memory checkbox)
  2. OR go through each profile and restrict access to the Payments2Us, all Payments2Us Tabs/Objects and Object fields.

Further and more detailed help is not part of our standard support

It seems App taking too long to install, what does this mean?

If you are getting an message saying "This app is taking a long time to install." ...

If you are getting an message saying "This app is taking a long time to install.", then this means that it will take a while to install.

The App does take 10 to 15 minutes normally to install.

You will get an email confirmation after the install process has finished.

Or, on the Screenshot shown below, you can press the "Done" button and this will take you to the installed Apps page of Salesforce. From here, periodically do a control+screen refresh until you see "Payments2Us" as one of the Apps.

Package Upgrade - Publish LWR Community

If any of Payments2Us LWC components are used in a LWR community then after packa ...

If any of Payments2Us LWC components are used in a LWR community then after package upgrade the community need to be “Publish” again. Review Salesforce help article for details:
https://developer.salesforce.com/docs/atlas.en-us.exp_cloud_lwr.meta/exp_cloud_lwr/template_differences_publish.htm?utm_source=chatgpt.com

As of Version 10.5, any changes in the Membership update related LWC would need the republishing of LWR community. In general, if you find any issue or discrepancy with respect to any Payments2Us LWC components after package upgrade then Publish the LWR community.

Here are the steps to publish a Salesforce Experience Cloud (Community):

  • Go to Setup.
  • In the Quick Find box, type Digital Experiences.
  • Click All Sites.
  • Find the community you want to publish.
  • Click Builder next to the community name.
     
  • Click the Publish button in the top-right corner.
  • Wait for the publishing process to complete.
  • You’ll see a confirmation message once the community is published.